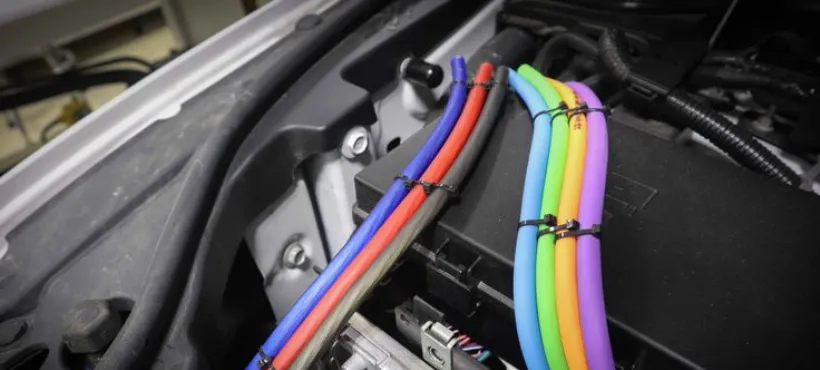
The first step you’ll most probably take after buying a new aftermarket amplifier is installing it into your vehicle.
And for that, you’ll need different types of wire including the power and ground wires.
But upon further research, you’ll find different types of wire that essentially look the same – with the only difference being their ‘gauge’.
Gauge refers to the thickness of the wire – a lower gauge wire will be thicker than a higher gauge wire.
Choosing a correct wire gauge is important because installing a smaller one will affect the power delivery and cause clipping. This would result in poor performance or even shorter lifespan of amp and speaker(s) in some cases.
And while going for a larger wire gauge is not bad, it’s definitely an overkill from the budget point of view. That’s why you shouldn’t go for either extreme and pick a suitable wire using the formula we’ll discuss below.
What Gauge Wire do I Need for Amp?
- InstallGear 4 Gauge OFC Wire (Best Wire for 500W Class AB Amp)
- KnuKonceptz Kolossus Flex Kable OFC 8 Gauge (Best Wire for 500W Class D Amp)
- InstallGear 4 Gauge OFC Wire (Best Wire for 600W Class AB Amp)
- Iron Forge Cable 6 Gauge OFC Wire (Best Wire for 600W Class D Amp)
- InstallGear 1/0 Gauge OFC Wire (Best Wire for 1200W Class AB Amp)
- InstallGear 4 Gauge OFC Wire (Best Wire for1200W Class D Amp)
What gauge wire you choose for your amp will depend on your system’s current consumption and the length of the wire.
We’ll use Ohm’s law to find the current draw. According to this law, I=P/V.
So to find the value of the current we’ll have to divide the power of the amp by the system voltage.
Although vehicles come with a 12-Volt electrical system, the alternator boost this number when the vehicle is running. This is why we get 13.8-Volt system voltage.
Now, all we need to find next is the Amp power.
1. Find Total RMS of Your Amplifier
For this, you’ll have to multiply the total number of amp channels by the total number of RMS watts per channel. For example, if you have a mono amp with 500W RMS, then 500W would be your final result.
But if you have a 4-channel amp, like Kicker 46CXA360.4T, with 90 watts RMS x 4 at 2 Ohms, then the total RMS will be 360 watts (90×4).
In case you have multiple amps in your vehicle, the total RMS will be the sum of their RMS values.
2. Divide Total RMS by Efficiency Value
The value we found in the first step is the total power that can come from our amplifier. But since no amplifier is 100% efficient, the actual input we need to produce this amount of power would be a little higher – depending on its class.
For example, class AB amps are 50% efficient while class D amps are 80%.
Since Kicker 46CXA360.4T is a class AB amp, we’ll have to divide its RMS value by 0.5 to get our required value. In our case, it’s 720 Watts. This is the power we need to provide the amp for 360 watts of RMS.
3. Find Current Draw
Now that we’ve found the power value, we’ll find the value of current that will pass through our wire. By plugging it into our formula I=P/V, the current value will be 52.17A – since 720/13.8 equals 52.17.
4. Find the Length of Wire
Now it’s time to find the wire length we’ll need to install the amp successfully. To be specific, you’ll have to calculate the distance between the battery to the amp.
Although it’s mostly between 16-19 feet, your calculated length can be more/less depending on your vehicle.
5. Calculate Gauge
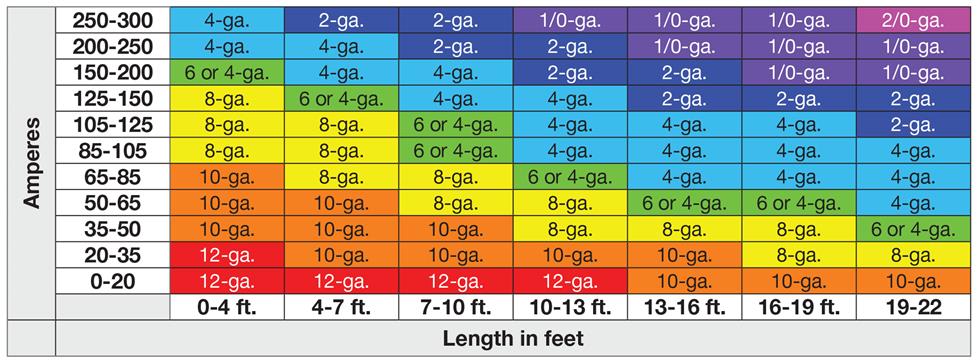
Now that we’ve done all of our calculations, we’ll find the correct gauge with the help of the chart above. Since our current is 52.17A, we’ll shortlist the values in the 4th-last row (50-65). And since the wire length is 16-19 ft., we’ll select the 2nd rightmost value in our preselected row: 6 or 4-ga.
This means a 6-ga or 4-ga wire will be good enough for our amplifier.
One important thing to note is that this chart works better if you have the copper wires instead of Copper-Clad Aluminum (CCA) wires.
The CCA wires are budget-friendly but don’t have as good current handling capability (due to high resistance) as the standard copper wires have. That’s why you should always try to go for the latter.
Lastly, the power and ground wires are just two of the many cables you’ll need for a car amplifier installation. You’ll also have to choose a speaker wire, an RCA cable, a remote turn-on wire, and a fuse holder/fuse.
Buying each of these items individually can consume a lot of your time. That’s why you should go with an amp wiring kit. This kit will have all the accessories you’ll need for the installation process.
Frequently Asked Questions
To help you out, I’ve already calculated the suitable wire gauges for some of the most commonly used amps.
Please note that I have made these calculations with a standard vehicle in mind. In case you have a bigger vehicle, you’ll have to make adjustments.
What Gauge Wire for 500 Watt amp?
Depending on the class of your 500W amp, you’ll either need a 4 or 8-ga wire.
What Gauge Wire for 600 Watt amp?
Depending on the class of your amp, you’ll either need a 4 or 6-ga wire for a 600-watt amp.
What Gauge Wire for 1000 and 1200 Watt Amp?
For a 1000 watt amp, you’ll need a 2-ga wire if it’s class AB or a 4-ga wire if it’s class D. The same goes for a 1200 watt amp. You’ll need a 1/0-ga wire if it’s class AB and a 4-ga wire if it’s class D.
What Gauge Wire For 1500 and 2000 Watt Amp?
For 1500 and 2000 watt amps, you’ll need a 1/0-ga wire regardless of their class.