Installing an aftermarket car stereo is not complicated once you identify the correct wiring color code. I will show you a straightforward color code car stereo wiring diagram to help you with the wiring.
Nowadays, aftermarket stereos are not all over the place regarding wire colors, unlike OEM head units. Manufacturers have a standardized color scheme that helps users identify the ground, power, antenna, and speaker wires in a cinch.
Let’s get into how to identify aftermarket car stereo wiring codes and how to wire your car stereo with or without a harness.
How to Identify Aftermarket Car Stereo Wiring Code
It’s a must that you identify the color of the wires to make a correct connection. Otherwise, your stereo may not turn on, or you risk short-circuiting components. After I explain these wire colors, all you have to do is identify the matching wires for your vehicle.
These wires match aftermarket radio harnesses from brands like Sony, JVC, Pioneer, Kenwood, and Alpine. Aftermarket car stereo wiring can be grouped into four types.
But first, look at this diagram that I’ll use to explain the colors of the different wires.
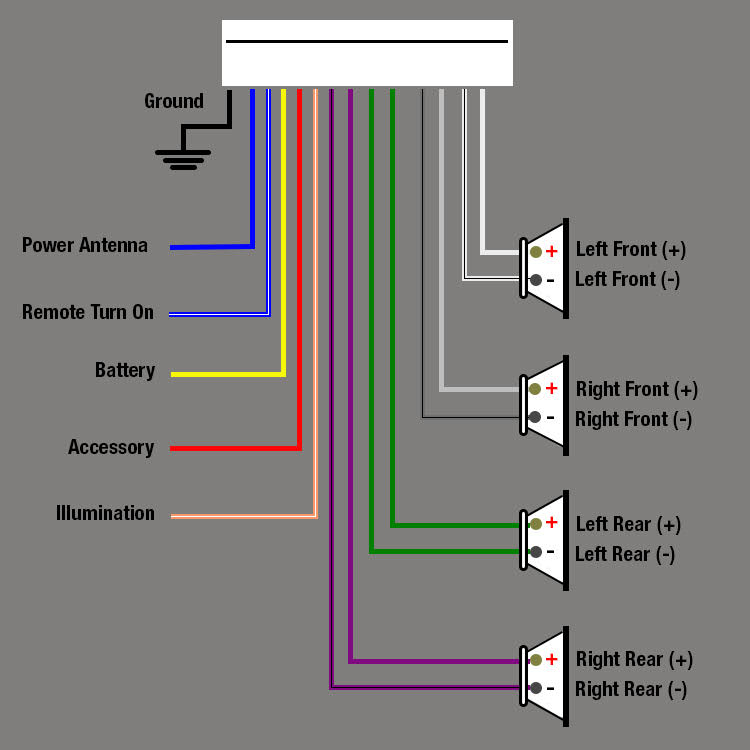
Ground Wire
This wire is usually black and has a negative polarity. It’s also known as the Chassis Negative Ground.
Power Wires
Your aftermarket stereo comes with three power wires. There’s the yellow wire supplies constant 12V regardless of the key position. The red wire is the accessories wire which is also a 12V power source, but it requires turning on the ignition.
Then, there’s the orange wire which is an illumination wire. It provides 12 volts of power when your car’s exterior lights are on. Some vehicles can have an orange wire with a white strip, also known as the dimmer wire. This wire supplies 0 – 12 volts of power from the car and is adjustable with the interior light dimmer control.
Speaker Wires
There are four car stereo wires for the speakers, each with its variant. The white wire is the (+) for the left front speaker, while the white with a black stripe is the (-) for the same speaker. On the other hand, the grey wire connects to the (+) of the right front speaker, and the grey with white is the (-) of the same speaker.
The left rear speaker takes the green wire for its (+) and the grey with a black stripe (-). Finally, the violet wire is the (+) for the right rear speaker, while the violet with black is the (-) of the right rear speaker.
Amplifier and Antenna Wires
By now, you’ll be remaining with the blue wires. The blue is the antenna wire, while the blue with a white stripe is the amplifier remote turn-on wire. If you don’t know how to connect the remote wire for the amp, you can read the linked-article.
How to Wire the Car Stereo Using a Harness
When you’re ready to install the car stereo, the simplest way to go about it is using a harness. A harness connects the aftermarket stereo harness to the stock stereo system’s wiring.
Step 1: Trim the Harness
Make sure that you purchase a harness that works for the aftermarket stereo and the car. When you receive the harness, you can trim it to fit behind the dash. Nonetheless, it’s not wise to cut the noise filter, inline fuse on the accessory wire, or the fuse on the constant wire.
Step 2: Group the Wires
You want to keep the wires that work around each other together for a clean setup. So, tape together the power wires using black harness tape.
Step 3: Add the Heat Shrink
For the strongest connection, it’s best to solder the wires. In this case, the next step is to add the heat shrink tubing before soldering. Therefore, cut the heat shrink and insert the pieces into the wires.
Step 4: Solder the Connections
Start by stripping the insulation from the power wires and then soldering them to the corresponding wires in the aftermarket stereo harness. Then do the same for the speaker wires, antenna and amplifier wires, and ground wire.
Step 5: Connect the Harness
One end of the harness will go into the aftermarket stereo while the other will connect to the car. Turn on the radio, and your new stereo is ready to work. It’s as simple as that, guys!